
LinkedIn MCP Server Installation
Set up the Linked API MCP server in Claude, Claude Desktop, Claude Code, ChatGPT, Codex, Cursor, VS Code or Windsurf (Devin Desktop) – each client has its own section below. First the server needs tokens to access your LinkedIn account. Here's how to get them:
- Sign up at Linked API Platform.
- Choose your plan and start your 7-day free trial.
- Connect your LinkedIn account (it takes about 2 minutes).
- Copy your tokens from the dashboard (as shown below):
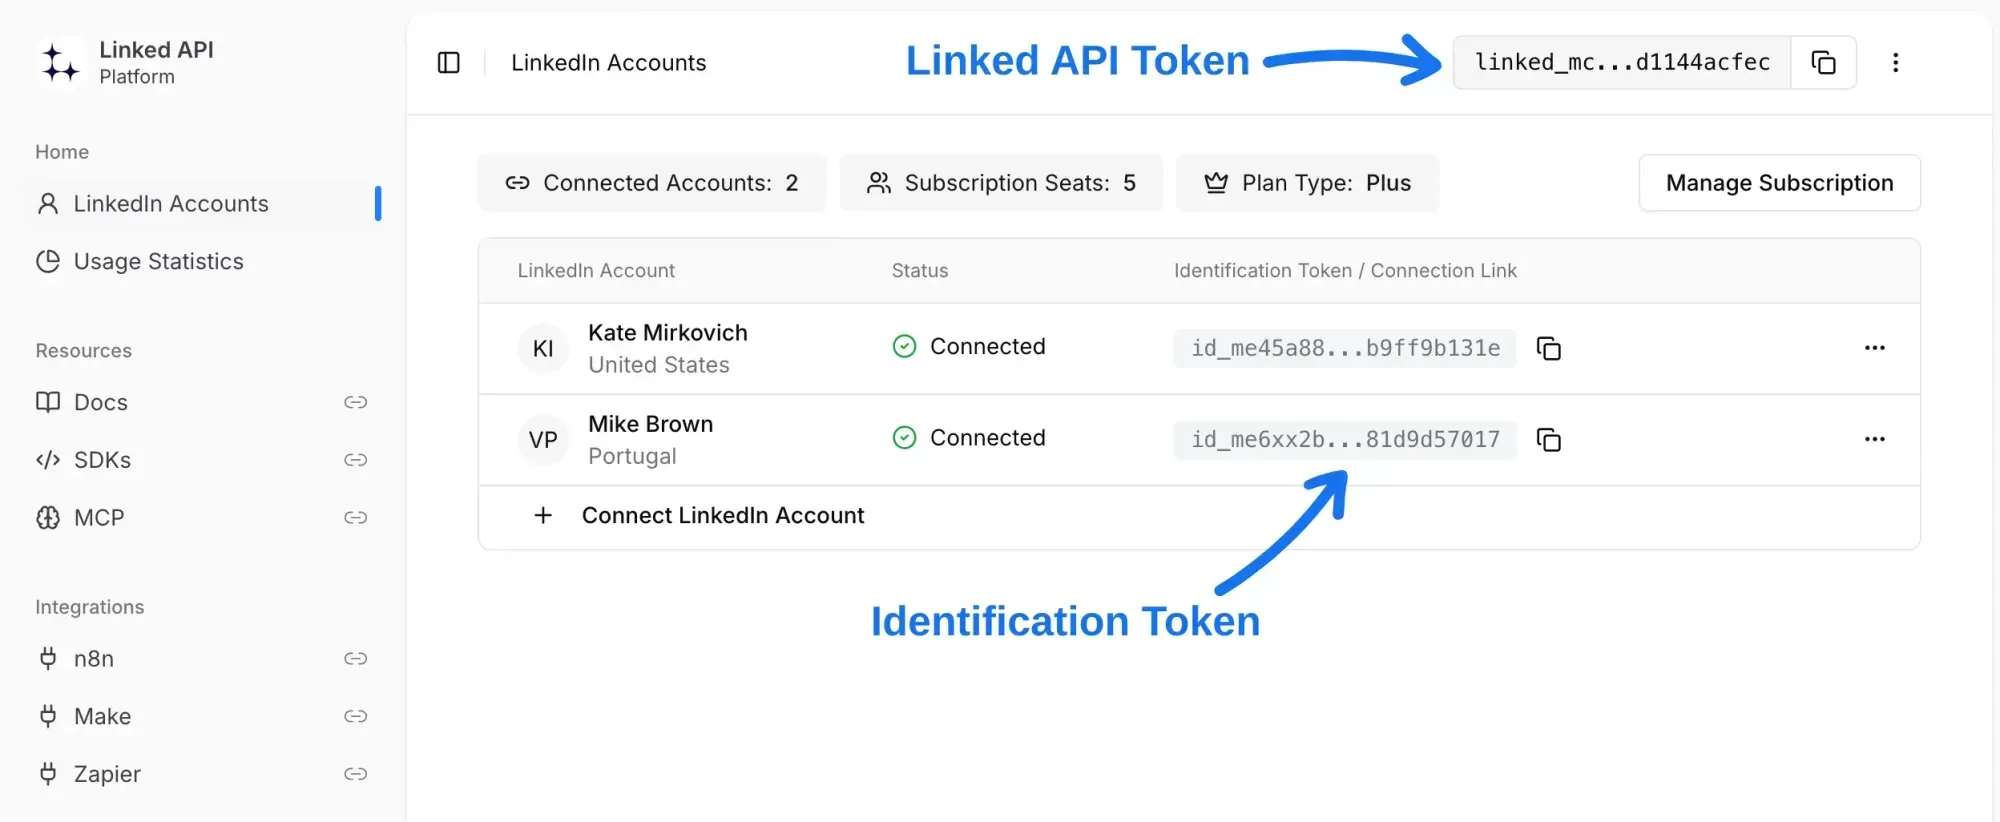
Multiple LinkedIn accounts:
If you have multiple LinkedIn accounts, you'll get a separate identification token for each one, and you can create multiple MCP server instances – one for each account.
Claude
Connect Linked API as a custom connector. One connector covers claude.ai, the Claude Desktop app and Cowork – they share the same account.
Free, Pro and Max plans:
- Go to Customize → Connectors.
- Click +, then Add custom connector.
- Paste this URL (replace with your actual tokens) and click Add:
https://mcp.linkedapi.io?linked-api-token={YOUR_LINKED_API_TOKEN}&identification-token={YOUR_IDENTIFICATION_TOKEN}&client=claudeLeave "Advanced settings" empty – the tokens in the URL are the authentication, so no OAuth client is needed. Free plans are limited to one custom connector.
Team and Enterprise plans:
Only an organization Owner can add the connector, under Organization settings → Connectors → Add → hover Custom → Web. Everyone else then enables it for themselves under Customize → Connectors.
Claude Desktop
The custom connector above already covers Claude Desktop – add it once at Customize → Connectors and it shows up in the desktop app.
Run the server on your own machine instead only if you need to. Add this to your Claude Desktop config file:
- macOS:
~/Library/Application Support/Claude/claude_desktop_config.json - Windows:
%APPDATA%\Claude\claude_desktop_config.json
{
  "mcpServers": {
    "linkedapi": {
      "command": "npx",
      "args": ["-y", "@linkedapi/mcp"],
      "env": {
        "LINKED_API_TOKEN": "{YOUR_LINKED_API_TOKEN}",
        "IDENTIFICATION_TOKEN": "{YOUR_IDENTIFICATION_TOKEN}"
      }
    }
  }
}
Restart Claude Desktop after saving.
Claude Code
Add the remote MCP server with a single command:
claude mcp add linkedapi \
  --scope user \
  --transport http \
  "https://mcp.linkedapi.io?linked-api-token={YOUR_LINKED_API_TOKEN}&identification-token={YOUR_IDENTIFICATION_TOKEN}&client=claude-code"
--scope user makes the server available in every project. Without it Claude Code uses its default, local scope: private to you and active only in the project you added it from – the git repository root, or this directory if you are not in a repository. Keep the double quotes around the URL – unquoted, your shell splits the command at the first &.
Claude Code answers Added HTTP MCP server linkedapi with URL: https://mcp.linkedapi.io to user config. It prints the URL without its query string, but your tokens are stored. claude mcp list then shows linkedapi ✔ Connected, which means the server is reachable rather than that your tokens are right, and the line it prints carries both tokens in full. To check the tokens themselves, ask for something read-only in a session, such as a profile lookup.
Or add it locally via NPX:
claude mcp add linkedapi \
  --scope user \
  -e LINKED_API_TOKEN={YOUR_LINKED_API_TOKEN} \
  -e IDENTIFICATION_TOKEN={YOUR_IDENTIFICATION_TOKEN} \
  -- npx -y @linkedapi/mcp
Tip: For Claude Code, you may find it more convenient to use our LinkedIn CLI or Agent Skills instead of MCP – they provide a more native integration with the agentic coding workflow.
ChatGPT
ChatGPT calls custom MCP servers plugins, and adding one needs developer mode:
- Open Settings → Security and login and turn on Developer mode. Whether you have it depends on your plan, and in a managed workspace an admin may have to allow it first.
- Go to chatgpt.com/plugins and click the + button.
- Give the connection a name and a short description.
- Under Connection, paste this URL (replace with your actual tokens):
https://mcp.linkedapi.io/mcp?linked-api-token={YOUR_LINKED_API_TOKEN}&identification-token={YOUR_IDENTIFICATION_TOKEN}&client=chatgpt- Click Create, then review the tools ChatGPT discovered.
Add the connection from the tools menu in a new chat to use it.
Codex
Add the MCP server to your Codex config file at ~/.codex/config.toml:
[mcp_servers.linkedapi]
url = "https://mcp.linkedapi.io?linked-api-token={YOUR_LINKED_API_TOKEN}&identification-token={YOUR_IDENTIFICATION_TOKEN}&client=codex"
Or add it via CLI:
codex mcp add linkedapi \
  --url "https://mcp.linkedapi.io?linked-api-token={YOUR_LINKED_API_TOKEN}&identification-token={YOUR_IDENTIFICATION_TOKEN}&client=codex"
Keep the double quotes around the URL – unquoted, your shell splits the command at the first &. Run codex mcp list to check the server is there, or type /mcp inside the Codex TUI. To scope it to one repository instead, put the same table in that project's .codex/config.toml; Codex loads it only in projects you have marked trusted. Accept the trust prompt the first time you run codex in the repository, or add [projects."/absolute/path/to/repo"] with trust_level = "trusted" to ~/.codex/config.toml yourself – use the repository root, not a subdirectory. Until the project is trusted Codex simply omits the server, and codex mcp list says nothing about trust.
Tip: For Codex, you may find it more convenient to use our LinkedIn CLI instead of MCP – it gives you shell-native LinkedIn commands that work naturally in any terminal-based agent.
Cursor
Cursor reads MCP servers from a config file: ~/.cursor/mcp.json for every project, or .cursor/mcp.json in a project root for that project only.
{
  "mcpServers": {
    "linkedapi": {
      "url": "https://mcp.linkedapi.io?linked-api-token={YOUR_LINKED_API_TOKEN}&identification-token={YOUR_IDENTIFICATION_TOKEN}&client=cursor"
    }
  }
}
Open Customize in the Cursor sidebar to see the server and switch it on or off. You can add and manage servers from there too.
VS Code
VS Code has built-in MCP support (no extension required). Add a .vscode/mcp.json file to your project:
{
  "servers": {
    "linkedapi": {
      "type": "http",
      "url": "https://mcp.linkedapi.io?linked-api-token={YOUR_LINKED_API_TOKEN}&identification-token={YOUR_IDENTIFICATION_TOKEN}&client=vscode"
    }
  }
}
To have it in every project instead, run MCP: Open User Configuration from the Command Palette and put the same entry in that file. VS Code moved MCP servers out of settings.json into a profile-specific mcp.json in version 1.102 and migrates old entries automatically, so don't add them to settings.json any more.
You can also add it from the command line:
code --add-mcp "{\"name\":\"linkedapi\",\"type\":\"http\",\"url\":\"https://mcp.linkedapi.io?linked-api-token={YOUR_LINKED_API_TOKEN}&identification-token={YOUR_IDENTIFICATION_TOKEN}&client=vscode\"}"Windsurf
Windsurf was renamed Devin Desktop in June 2026, and the MCP setup moved with it.
Devin Local, the agent new tabs open with:
devin mcp add -s user linkedapi "https://mcp.linkedapi.io?linked-api-token={YOUR_LINKED_API_TOKEN}&identification-token={YOUR_IDENTIFICATION_TOKEN}&client=windsurf"Or edit ~/.config/devin/mcp_config.json (%APPDATA%\devin\mcp_config.json on Windows) directly:
{
  "mcpServers": {
    "linkedapi": {
      "url": "https://mcp.linkedapi.io?linked-api-token={YOUR_LINKED_API_TOKEN}&identification-token={YOUR_IDENTIFICATION_TOKEN}&client=windsurf"
    }
  }
}
Legacy Cascade agent: open the ... (Actions) menu at the top right of the Cascade panel, then Open MCP config file in the MCPs section. It is the same file, and serverUrl works there as well as url.
Local installation
For clients that support local MCP servers, you can run Linked API MCP server directly on your device using NPX:
{
  "mcpServers": {
    "linkedapi": {
      "command": "npx",
      "args": ["-y", "@linkedapi/mcp"],
      "env": {
        "LINKED_API_TOKEN": "{YOUR_LINKED_API_TOKEN}",
        "IDENTIFICATION_TOKEN": "{YOUR_IDENTIFICATION_TOKEN}"
      }
    }
  }
}